If you haven’t done so already, create a free account with us and/or login. You’ll be taken to a dashboard where you can create a new project or find your existing ones.
1. Create New Project
There are three ways to start a project in the Locatify Builder:
A. Blank Project – Start from scratch and customize everything to fit your needs.
B. From Template – Choose from our pre-designed templates for inspiration or use them as-is for a quick setup.
C. From File – Upload an existing Locatify project to continue working on it or make adjustments.
Skip ahead to the section that aligns with your project for the most relevant guidance.
A. Blank Project – Start from Scratch
Create a fully customized project tailored to your needs.
- From the homepage, click Blank Project in the center.
- Or, use the left-side menu: click the + symbol, select New Project, then choose Blank Project.
Project Wizard
Now, you're in the project wizard. To navigate, follow each step and click as you go.
- Step 1: Select the Project Type
If you want to create a tour, click on "Audio Guide Tour".
If you want to create a game, click on "Treasure Hunt Game" to continue.
💡 Tip: The icons in the top right of each tile indicate which app types support the project.
Shared Apps - TurfHunt and SmartGuide
- Step 2: Select the Project Format
After select "Audio Guide Tour" or "Treasure Hunt Game", select "Indoor Map".
- Step 3: Choose the Activation Method
Decide how locations will be triggered:
- Automatic Activation
BLE Beacons: The beacons are small battery-driven devices that can easily be placed around the venue, near the subject the user would be standing in front of when the app automatically activates the content when the user is within a certain range of the beacon. The beacons are registered in the Locatify Builder and associated with the stations, or floor plans, that they should activate.
More info: What are BLE Beacons? – Locatify
or
Ultra-Wideband (UWB): This is for very precise location detection. The UWB installation consists of anchors mounted on walls and tags for the objects you want to track. This is a pricier alternative to BLE beacons that needs infrastructure (ethernet) to work.
More info: What is Ultra-wideband (UWB)? – Locatify
- Automatic with Interaction
Manual: This means that the stations are activated only by pressing on them on the screen (making it a virtual project).
*QR code: Open the stations by scanning a unique QR code (this method can be added at a later stage).
*Number Pad: Open a station adding a unique number to the Number Pad (this method can be added at a later stage).
Click Next to continue.
- Step 4: Select Settings
Optionally, add additional languages to your project. Note: You’ll need to provide translations for each selected language.
Next, give your project a name. For this demo, we’ll call it “New Project”.
Note: The title, activation method, languages, and other project settings can be changed at any time.
Click Add Project to proceed. (From this point, you can skip to 2. Main Information)
B. From Template – Start with a Pre-Designed Setup
Use a ready-made template to quickly set up your project or get inspired for customization.
- From the homepage, click From Template in the center.
- Or, use the left-side menu: click the + symbol, select New Project, then choose From Template.
Project Wizard
(Prefer to watch this tutorial? Click here!)
Now, you're in the project wizard. To navigate, follow each step and click as you go.
- Step 1: Select the Project Type
Now, you're in the project wizard. To navigate, follow each step and click as you go.
If you want to create a tour, click on "Audio Guide Tour".
If you want to create a game, click on "Treasure Hunt Game" to continue.
💡 Tip: The icons in the top right of each tile indicate which app types support the project.
Shared Apps - TurfHunt and SmartGuide
- Step 2: Select the Project Format
After select "Audio Guide Tour" or "Treasure Hunt Game", select "Indoor Map".
- Step 3a: Select the Project Template
Browse the available templates and choose one that best fits your needs. Once you've selected a template, click Select to continue.
Note: Templates are in English by default. Additional languages can be added by entering translations within the project.
- Step 3b: Choose the Activation Method
Decide how locations will be triggered:
- Automatic Activation
BLE Beacons: The beacons are small battery-driven devices that can easily be placed around the venue, near the subject the user would be standing in front of when the app automatically activates the content when the user is within a certain range of the beacon. The beacons are registered in the Locatify Builder and associated with the stations, or floor plans, that they should activate.
More info: What are BLE Beacons? – Locatify
or
Ultra-Wideband (UWB): This is for very precise location detection. The UWB installation consists of anchors mounted on walls and tags for the objects you want to track. This is a pricier alternative to BLE beacons that needs infrastructure (ethernet) to work.
More info: What is Ultra-wideband (UWB)? – Locatify
- Automatic with Interaction
Manual: This means that the stations are activated only by pressing on them on the screen (making it a virtual project).
*QR code: Open the stations by scanning a unique QR code (this method can be added at a later stage).
*Number Pad: Open a station adding a unique number to the Number Pad (this method can be added at a later stage).
Click Next to continue.
- Step 4: Select Settings
Optionally, add additional languages to your project. Note: You’ll need to provide translations for each selected language.
Next, give your project a name. For this demo, we’ll call it “New Project”.
Finally, place your project on the map. You can zoom in and out using the + and - symbols or use your mouse wheel.
Note: The title, activation method, languages, and other project settings can be changed at any time.
Click Add Project to proceed.
Customize the template as needed—add new content, adjust challenges, or refine project settings to match your vision.
(From this point, you can skip to 2. Main Information)
C. From File– Upload an Existing Project
Import a previously created Locatify project to continue working on it or make adjustments.
- From the homepage, click From File in the center.
- Or, use the left-side menu: click the + symbol, select New Project, then choose From File.
A window will open. Follow the instructions to upload your project.
Note: The project has to be in a zip file.
C. From File– Upload an Existing Project
Import a previously created Locatify project to continue working on it or make adjustments.
- From the homepage, click From File in the center.
- Or, use the left-side menu: click the + symbol, select New Project, then choose From File.
2. Edit (project information and settings)
Let’s start with the project information and settings. Click on Edit (see arrow).
2.A Content
Let‘s start with the content. Here you find the information that your users see when they first access your tour in the app.
Here you can:
- Edit your project's name.
- Give your project an image or logo.
- Add a subtitle if you’d like, add a description and give your location a name.
- Upload an audio or video file if you want an introduction before the user downloads the tour/game. To reduce download time for your users, keep any video files uploaded under 30 seconds.
With a Premium license, you can choose an extended layout template for more customisation like adding additional slides, and changing the color of the background, text, and title.
2.B Location
Under the Location tab, on the right side you can find the "Project Location". This was pre-selected in an earlier stage but you can edit it again from there.
On the left side, you can select the "Station Activation Methods":
You have a few options:
- Activation with Interaction:
- Manual Activation Only
- Scan QR codes
- Use Number Pad
- Automatic Activation:
- iBeacons Proximity
- UWB RTLS Precise Location
2.C Coupons
Here you can upload and manage coupons. Keep in mind that coupons are only rewarded to users if the project is set up as a game.
2.D Advanced
Under Project options you decide if you want to show your project in the app. If you don’t want it to be visible, then users will need an invitation code to access it.
Under Game options you have options that only apply if your project it set up as a game. You can select if you want to request users’ email when they join the project and if you want your game to be time-based.
In Project Category: showing only for Branded Native App feature
2.E Game Message
Click on Game Message to give your users an optional game over message if your project is set up as a game.
And a directions to start message for when they begin the project.
2.F Custom Pin
Use the Default pin or upload your own custom pin by clicking on "Manage Pins"
- Tour Pin: Pin for the whole tour the user's will see on the main project's page.
- Game Pin: Pin for the whole game the user's will see on the main project's page.
- Tour Destination Point: Pins set within the tour, they will show on the map inside the project.
- Default: Pin not opened.
- Active: Pin currently opened.
- Used: Pin already opened.
- Future: Next Pin if you create a specific path.
-
- Tour Info Point: (branded native app feature)
- Treasure Point: Pins set within the game, they will show on the map inside the project.
Default: The pin set to indicate the location (with game challenges) to visit.
Found: The pin indicating the location (with game challenges) has been visited.
Now click on Save and exit.
3. Add the First Floor
Indoor projects consist of floors and stations. You need at least one floor and on it, you can put a floor plan graphic and stations that will appear on the top of the floor plan. If you skip the floorplan and just have stations, then the stations are shown as a list in the app.
Start by clicking on Add floor on the left side panel.
3.A Floor Info
a) Content
Here you can:
- Name the floor.
- Upload background audio to play on a loop when this floor is active. Check the box next to it if you want the audio file to start playing automatically when the floor is activated.
- Add languages.
- Insert the floor title for each language the tour will be available in – this title will be shown in the app.
- Upload floor audio which will be activated when a user enters the floor. It will then stop when a station is activated.
b) Floor plan
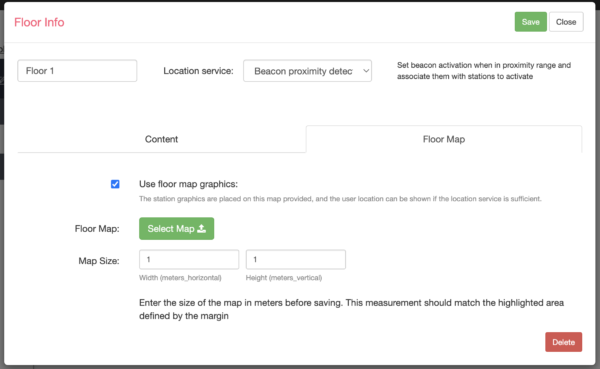
Here you can upload a floor plan graphic where your station graphics will be placed upon. (Remember, if you just have stations and no floorplan you can skip the floor map graphics, and then the stations are presented in a list in the app.)
You will also need to enter the size of the floor in meters, width and height.
Drag the square to define the margins of the floor. The highlighted area should match the measurements you inserted above.
Click on save and close so you can continue with the stations.
4. Add a Station
Start by clicking on the + next to Stations on the left hand panel.
Now click again on the floor plan to place it where you want it, then click again on it to drag it to the right position and size it correctly.
4.A Add Content to Station
Now scroll down to the Station content. Under the Basic tab you can:
- Name the station in the CMS (Alias).
- Upload your own custom active and inactive images that represent the station on the floor map.
- Add more languages.
- Give your station a title that will be visible to the users (this is required).
- Upload the audio guide for the station, it will start playing automatically when the station is activated.
And on to the information layout. Here you can choose to have the popup window display automatically when the station is activated. You can either use the default layout with only description text or click on Template and edit content to customise the look.
*This is where the unique QR code or Number Pad would show if you'd chosen this Activation Method.
Click on the Treasure tab and add challenge(s) if you want your project to be set up as a game.
*Locked Treasure: When this option is enabled, players must visit the location to unlock and access the challenges. The unlocking is based on the selected activation method (QR code, etc.).
Now click on save and close this station.
4.B Add a Beacon to your Station
Add beacon to station
(If you want to continue your project without location technology, skip this part)
If you want to use beacons in your project, start by clicking on the name of the Station you want to add a beacon to and then Add Beacon to Station.
This will open a drawer on the right side of the screen, where you start by clicking on Add beacon to give your beacon a title.
Add beacon
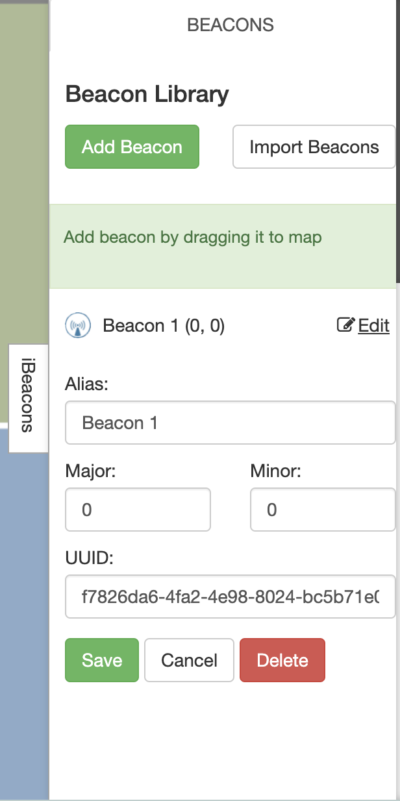
(See more about UUID, major and minor numbers here)
Once you’ve clicked on Add beacon, then give your beacon a title (or Alias).
The UUID field will autofill with a number from Kontakt.io (the provider we usually work with). If you’re using beacons from another provider you will have another number so just copy it and paste it here or insert it manually.
Insert the Major and Minor numbers as you see them in your beacon app or on your beacon.
x- and y-axis & radius
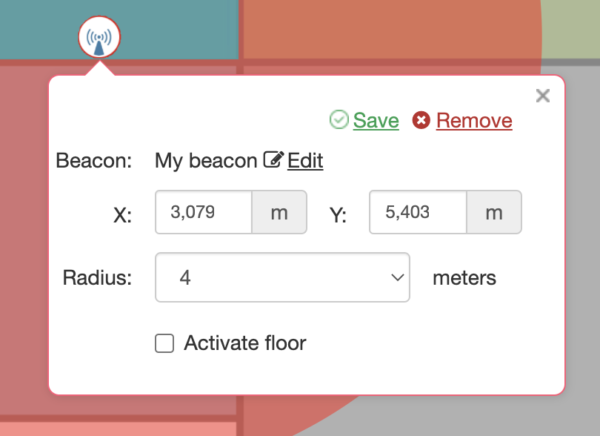
Here the x- and y-axis fields autofill in regards to where you drag the beacon, but you can also fill in these numbers manually.
Below you set the radius. The proximity measurement is best within 1-2 meters distance from the beacon, and accuracy will decrease the further away you go.
iBeacons proximity is normally divided into immediate (within a meter), near (within 6 meters) and far (within 30 meters). Please keep this in mind when selecting a distance for your beacons.
You can also choose if you want this beacon to activate the floor or only this station. If you choose floor activation, it will also appear on the side panel to the left, under Floor Activation Beacons.
Click save and exit.
5. Testing Project
Now we’re ready to test our project.
Select Publish
First, you should try your project on a mobile device by publishing it for testing. In this test mode, the project is only available to download in the app using a test code. If you are using game elements and locking stations so they can’t be opened until the user is at the location (using Beacons or UWB), then test games allow you to cheat by opening the stations without going there.
Click on Test on Device.
Test on Device
Now, download the Locatify TurfHunt app to your mobile device from the App Store or Play Store if you haven’t already.
And select Create Test Version.
From within the Locatify TurfHunt app, you can redeem your test project with either the QR code or the invitation code displayed here.
Please note we only allow a test code to be redeemed on one device. If you want to redeem it on another device, you must publish it again for testing.
6. Publishing
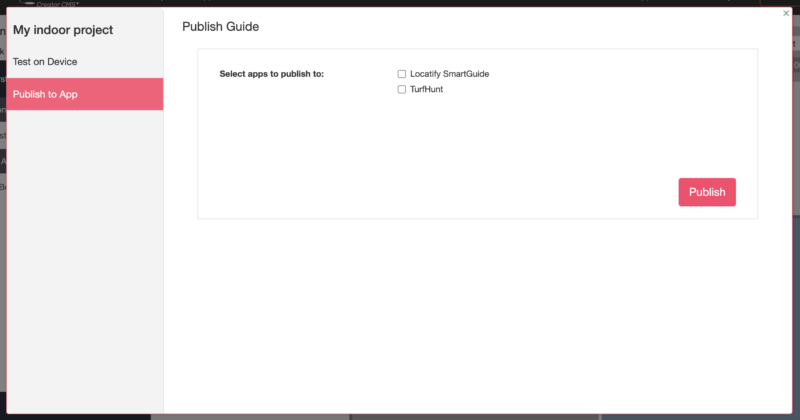
When you’re done with testing and ready to publish, select Publish to App and select which app you want to publish to. If your project is set up as a game, you should select TurfHunt, and if it’s a tour, you should select Locatify SmartGuide.
Now click Publish.